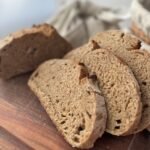
100% Whole Wheat Sourdough Bread Recipe: Delicious and Easy
Delicious and nutty whole wheat sourdough bread that everyone in the family will love. Whole wheat sourdough bread does not need to be dry and crumbly, as it often can be. Follow this recipe to try it out for yourself!
Servings: 10 Slices per Loaf
Calories: 114kcal
Equipment
- 1 Kitchen Scale
- 1 Large Mixing Bowl
- 1 Danish Hook
- 1 Dutch Oven/Combo Cooker
- 1 Bread Lame
- Flour Towels
Ingredients
- 105 g Sourdough Starter Levain Made at least 12 hours before
- 500 g Whole Hard Wheat Flour
- 400 g Water Divided, 100g boiling water for scalding
- 10 g Kosher Salt
Instructions
Making the Starter Levain (at least 12 hours before starting)
- Make a levain the night before mixing 50g of flour (all purpose or whole wheat flour is fine here), 50g of water, and 5g of sourdough starter.
- If it is colder or you have a less active starter, use 10g of starter.
Mixing your Dough
- The next morning, autolyze your ingredients: In a small bowl set aside 100g of flour and add 100g of boiling water from a kettle to it. In a large bowl, mix the remaining 400g flour with the remainder 300g of water.
- Cover both with an airtight lid or damp towel and let it sit for 30 minutes.
- After 30 minutes, mix the scalded flour, autolyzed flour, levain, and salt together with a dough whisk.
- Once incorporated enough, switch to using your hand or a mixer using a dough hook.
- If using hands, just knead it however you like. Go to town on it.
- Mix and knead for 5-6 minutes until the dough is smooth and elastic - this will develop the gluten in your dough and help it rise and form its shape later
- If using a dough mixer, let it mix with the dough hook for 10-15 minutes on the medium-low setting (About a 4 for Kitchen Aid).
Bulk Fermentation
- Cover with a damp towel or airtight lid
- Bulk ferment for 4-6 hours until the dough looks 30-40% larger in size
- Between that time, do a few stretch and folds every 30 minutes to an hour allowing the dough to ferment untouched for the last 2 hours of your bulk ferment
- I typically do 2 stretch and folds and then 2 coil folds at the end to preserve the air bubbles that have already formed
- If you don’t have the time or capacity to do stretch-and-folds, it should be fine since we kneaded it so well in the initial mixing, which is key to this recipe.
Shaping
- Pour your dough out onto your counter
- Shape into a boule to create some tension
- Let the dough rest on your counter or cutting board for 15-20 minutes to allow the dough to relax and make the final shaping easier. This also helps prevent tears from forming when you begin to create tension.
- Spritz your hands and work surface with water. Start shaping your dough into a round boule or batard ensuring you create good tension across the top of the dough
Cold Fermentation/Retarding Bread Dough
- Lightly flour your banneton with wheat or rice flour
- Transfer the dough to the banneton with the bottom of the dough facing up
- Stitch or pinch the bottom of the dough together and then lightly flour with a bit of rice or wheat flour
- Cover and cold proof your dough in the refrigerator for at least 8 hours but not more than 24 hours.
Baking
- When ready to bake, preheat oven to 450F with dutch oven inside for 30 minutes
- While the oven is preheating, 5 minutes before it’s ready to bake in, turn the dough out onto your parchment paper or bread sling
- Dust off any excess flour
- Score your bread in the direction you want it to expand **See notes below for two scoring methods to choose from
- Create steam: add ice cubes or spritz your dough directly depending on the scoring method you choose
- Place dough into a baking vessel and bake for 30 minutes at 450F.
- Remove the lid and bake for an additional 12 minutes until golden brown
- After removing it from the oven, transfer the bread to a wire rack and allow it to cool completely before cutting into it.
Notes
Two Scoring Methods
For A Simple Score
If you don’t care about a beautiful design on your bread, you can just do one deep score across your dough in the direction you want it to expand.
Drop 1-2 ice cubes into the dutch oven under the parchment paper or bread sling right before baking.
For a Beautiful Score or Design
If you care for beautiful scoring (like I always do!) and want your design to show but still want a great oven spring, the trick is to lightly spritz the top of your dough with a bit of water and then dust a thin even layer of rice or wheat flour over the top.
Create your design using a scoring lame and then do one deep score in the direction you want your bread to rise,
I find that this method allows the design to still show through well whereas dropping in ice cubes created too much steam that the design disappeared into the dough.
Do NOT add ice cubes for this method
